Introduction to Dutch Oven French Bread
Making Dutch Oven French Bread at home may seem like an intimidating task, but I assure you, it’s much more approachable than you think! There’s a certain magic that happens when you combine just a few simple ingredients—flour, water, yeast, and salt—into a delicious loaf of rustic bread. Picking up this timeless technique opens the door for fresh, warm loaves that can elevate any meal, or even stand alone as a comforting snack.
Why Choose Dutch Oven French Bread?
You might wonder, why a Dutch oven? This versatile tool is a game-changer in bread-making because it creates a controlled environment with perfect moisture levels. The heavy lid traps steam released during baking, which is key to achieving that beautiful crust everyone loves. Whether you’re dipping it in olive oil, slathering it with butter, or using it as a vessel for your favorite Chicken Ham sandwich, you’ll be amazed at the difference this simple method makes!
Here are a few reasons to get excited about baking your own Dutch Oven French Bread:
- Cost-Effective: Making your own bread at home can save you a significant amount compared to store-bought. Think about it; the basic ingredients are relatively inexpensive and yield several loaves.
- Customization: When you bake at home, you control the ingredients. Fancy an herbed loaf? Toss in some rosemary or thyme! Love garlic? You could easily add that too.
- Freshness: Nothing beats the aroma of freshly baked bread wafting through your kitchen. Plus, you can enjoy it warm right out of the oven—a slice of heaven!
If you’re keen to dive deeper into the world of Dutch ovens and their versatility, you might find this culinary resource helpful. It delves into the history and variations of Dutch ovens, bringing context to your baking experience.
Embracing Dutch Oven French Bread not only enriches your cooking adventures; it also nurtures a deep sense of satisfaction from creating something with your own hands. So, let’s roll up our sleeves and get baking!

Ingredients for Dutch Oven French Bread
Key ingredients for the best bread
To craft a delicious homemade Dutch Oven French Bread, you’ll need a handful of simple ingredients that combine to create that wonderful crust and airy interior:
- Bread Flour: This high-protein flour gives your bread structure and chewiness. All-purpose flour can work in a pinch but won’t yield the same results.
- Water: Use warm water (around 110°F) to help activate the yeast effectively.
- Yeast: Go for active dry yeast or instant yeast; both will work beautifully to help your bread rise.
- Salt: This ingredient not only adds flavor but also controls yeast activity for a more flavorful loaf.
If you’re curious about the science behind bread-making, resources like King Arthur Baking offer excellent insights.
Optional add-ins for flavor
While the basic recipe is fantastic on its own, consider elevating your Dutch Oven French Bread with these optional add-ins:
- Herbs: Dried basil, rosemary, or thyme can add an aromatic touch.
- Cheese: Incorporate grated Parmesan or sharp cheddar for a savory twist.
- Olive Oil: Swirling in a bit of high-quality olive oil will enhance flavor and moisture.
- Seeds: Topping with sesame or poppy seeds can give your bread a crunchy finish.
Why not experiment with different combinations? It’s a fun way to personalize your loaf and impress friends and family!
Step-by-step Preparation of Dutch Oven French Bread
Baking your own bread might seem daunting, but with a little guidance, you’ll find it to be a rewarding and enjoyable process. Let’s go through each step of preparing Dutch Oven French Bread, ensuring you understand each part. Grab your ingredients and let’s get started!
Mixing the Dough
Begin by gathering your ingredients:
- 4 cups of all-purpose flour
- 1 ½ cups of warm water (about 110°F or 43°C)
- 2 teaspoons of salt
- 1 teaspoon of sugar (to feed the yeast)
- 2 teaspoons of active dry yeast
In a large mixing bowl, combine the flour, salt, sugar, and yeast. Create a little well in the center for the warm water, then slowly pour it in. Using a wooden spoon, stir until the mixture starts to come together. It’ll look shaggy, and that’s just fine! You want to hydrate the flour sufficiently to activate the gluten, which gives your bread structure.
Did you know that mixing the dough in this way allows for minimal kneading later? Interesting, right? For a detailed explanation on the science behind bread-making, check out King Arthur Baking.
Kneading the Dough
Once your dough has come together, it’s time to knead! Turn it onto a clean, floured surface. Knead the dough for about 7-10 minutes, until it’s smooth and elastic. You’ll know it’s ready when a little poke leaves a dent that slowly bounces back. This step develops the gluten, ensuring your Dutch Oven French Bread rises beautifully.
First Rise
After kneading, place your dough in a lightly greased bowl, cover it with a damp cloth, or plastic wrap, and let it rise in a warm place for about 1-2 hours. You’ll want it to double in size. This initial fermentation phase enhances the flavor and texture of the bread. While you wait, consider preparing a savory spread or dipping oil for your bread.
Shaping the Loaf
Once the dough has risen significantly, punch it down gently to release the air. Then, turn it out on a lightly floured surface. Shape it loosely into a round loaf by folding the edges inward, and then flip it seam-side down. Use your hands to create tension on the surface of the loaf. This technique helps achieve that lovely crust we all adore.
Second Rise
Position your shaped loaf on a sheet of parchment paper for easy transfer later on. Cover it with a cloth and let it rise again for about 30-60 minutes. This second rise is crucial for achieving that airy interior and perfect crust.
Preparing for Baking
While your dough is rising, preheat your oven to 450°F (232°C). Place your Dutch Oven inside to heat up as well—this creates steam for a superior crust. When your dough is ready, carefully remove the hot Dutch Oven, and enjoy the aroma!
To score your dough, use a sharp knife or a razor blade to create a few slashes on the top. This allows the bread to expand properly in the oven, preventing any unsightly cracks.
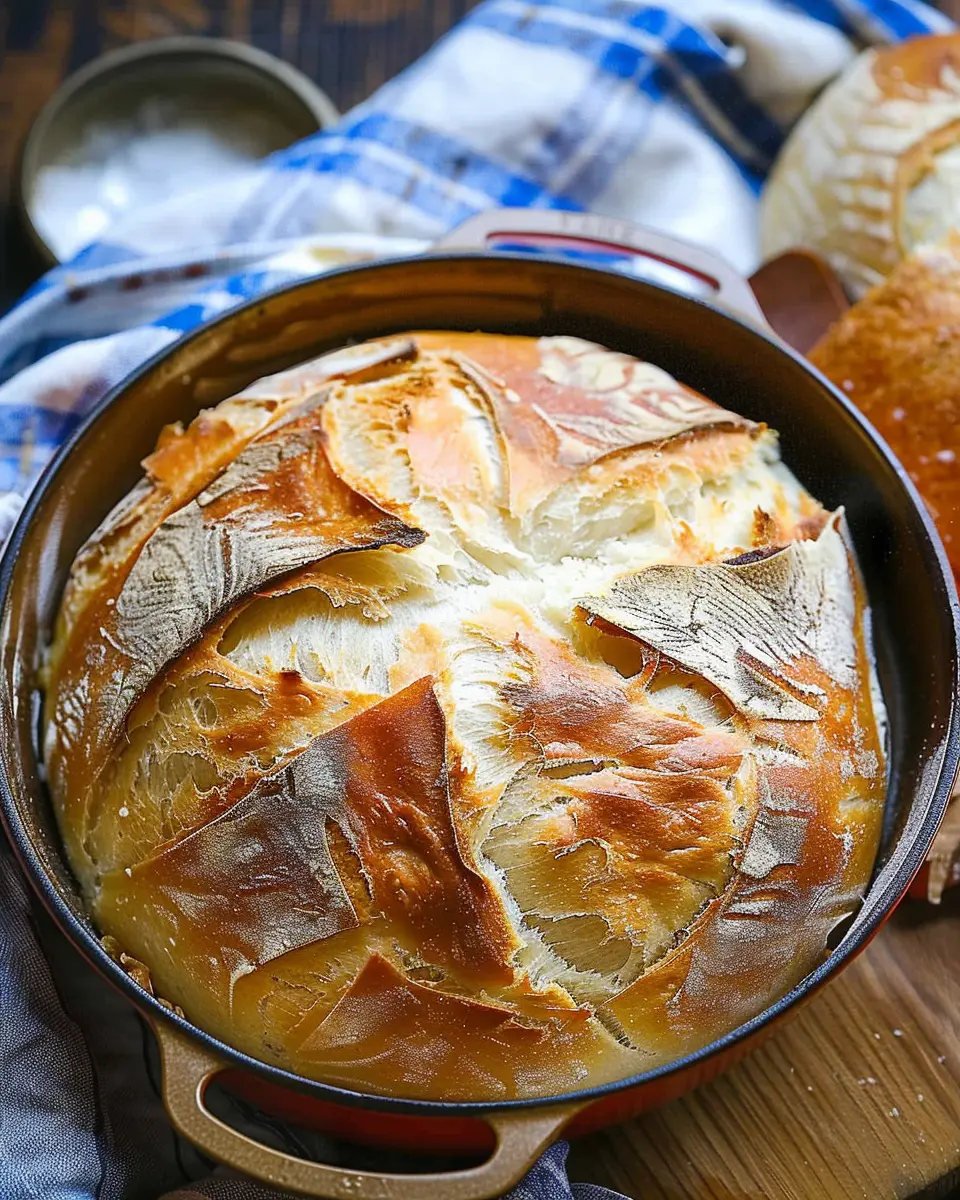
Baking the Bread
Using the parchment paper, lower your loaf into the preheated Dutch Oven. Cover it with the lid and bake for about 30 minutes. After that, remove the lid and bake for an additional 15-20 minutes until golden brown. The internal temperature should reach about 200°F (93°C) when done.
Once baked, let your Dutch Oven French Bread cool on a wire rack for at least 30 minutes before slicing. This allows the moisture to redistribute, ensuring a perfect crumb.
If you haven’t made homemade bread before, this simple method will surely impress your friends and family. The combination of flavors, textures, and the delightful aroma wafting through your kitchen will make you the star of any gathering. Happy baking!

Variations of Dutch Oven French Bread
If you’re looking to elevate your standard Dutch Oven French Bread, there are countless delicious variations to consider! Here are a couple of enticing options that add a unique twist to your baking adventure.
Herbed Dutch Oven Bread
For those who crave bold flavors, consider adding a medley of herbs to your Dutch Oven French Bread. Fresh rosemary, thyme, or oregano can take your loaf to new heights. Simply incorporate 2-3 tablespoons of finely chopped herbs into your dough during the mixing stage. The result? A fragrant loaf that’s perfect for accompanying soups, salads, or just slathered with butter.
- Tip: Add a sprinkle of sea salt on top before baking for an extra layer of flavor.
- Pairing suggestions: Serve with a light salad or as a side to your favorite dip.
If you’re interested in exploring the health benefits of herbs, check out sources like Healthline.
Cheese-Stuffed French Bread
For a heartier option, how about a cheese-stuffed French bread? Imagine pulling apart a warm loaf to reveal gooey, melted cheese inside. A blend of mozzarella and cheddar works wonderfully! After shaping your dough, flatten it and layer in the cheese before rolling it up into a log shape. Bake in your Dutch oven as usual, and prepare for some ooey-gooey goodness.
- Tip: Consider adding turkey bacon bits or chicken ham for a savory boost.
- Serving suggestion: This variation is fantastic for brunch or as a fun party appetizer!
No matter which version you choose, your Dutch Oven French Bread can easily transform to suit your taste. So, why not get creative and make these variations part of your baking repertoire? You might just find a new family favorite!
Cooking Tips and Notes for Dutch Oven French Bread
Common Mistakes to Avoid
When making Dutch Oven French Bread, it’s easy to slip up! Here are some common pitfalls to watch out for:
- Over-kneading the dough: This can result in a tough texture. Aim for a gentle knead until just combined.
- Inaccurate measurements: Even a little too much flour can throw off your dough. Use a kitchen scale for precision.
- Insufficient rising time: Patience is key! Allow your dough to rise until it’s double in size for that airy quality.
For additional tips on measuring ingredients accurately, check out King Arthur Baking.
Best Practices for Dough Texture
Getting the right dough texture is vital for that perfect French bread crust. Aim for:
- A sticky yet manageable dough: If it’s too dry, the bread will be dense. A good rule of thumb is that the dough should stick to your fingers slightly.
- Humidity considerations: If you’re in a humid area, adjust your flour accordingly – a bit less may be needed.
Monitoring these details can elevate your Dutch Oven French Bread from good to extraordinary! Happy baking!

Serving Suggestions for Dutch Oven French Bread
Pairing with Homemade Spreads
Freshly baked Dutch Oven French Bread is the perfect canvas for a variety of spreads. Consider whipping up your own artisanal butter by mixing softened butter with garlic and herbs. A simple olive oil and balsamic vinegar dip can elevate your bread to gourmet status.
You might also try creating a zesty hummus or an avocado mash seasoned with lime and salt, offering a combo that pairs wonderfully with the crusty exterior of your bread. For those who enjoy a sweet touch, homemade fruit jams or creamy cheeses can add a delightful contrast to the savory notes.
Enjoying with Soups and Salads
Nothing says comfort like dipping a slice of Dutch Oven French Bread into a bowl of steaming soup. Creamy tomato or hearty vegetable soups are excellent companions, as the bread soaks up those delicious flavors. If you prefer a lighter option, serve it alongside a refreshing salad — think mixed greens with a tangy vinaigrette.
This meal combination not only looks appealing but also creates a satisfying balance of textures and flavors. Remember, serving your bread warm enhances both its aroma and taste, inviting your friends and family to enjoy every bite. For more inspiration, check out this article on pairing bread with different dishes.
Whether you’re hosting a cozy gathering or just enjoying a quiet evening at home, Dutch Oven French Bread is sure to impress!
Time Breakdown for Dutch Oven French Bread
When it comes to making Dutch Oven French Bread, understanding the time commitment can make the process feel much more manageable. Here’s a quick breakdown:
Preparation Time
Plan for about 15 minutes to gather your ingredients and mix your dough. While this may seem quick, it’s during this time that the magic begins!
Baking Time
After letting your dough rise, you’ll spend around 30-35 minutes baking this delicious bread to a golden perfection. The heat of the Dutch oven makes a world of difference, ensuring a crispy crust and tender crumb.
Total Time
From start to finish, you’re looking at approximately 2-3 hours, which includes rising time. Most of this is hands-off, so you can multitask or enjoy a good book while waiting. For more baking tips, check out resources like King Arthur Baking or BBC Good Food to elevate your Dutch Oven French Bread journey!
Nutritional Facts for Dutch Oven French Bread
If you’re curious about the nutrition behind your delicious Dutch Oven French Bread, let’s break it down. This homemade delight isn’t just a treat for the senses; it’s also fairly straightforward when it comes to nutritional content!
Calories
On average, a single serving of Dutch Oven French Bread (about 1 slice or 50g) contains around 130 calories. It’s a great option for anyone looking to enjoy bread without going overboard on caloric intake.
Protein
Each slice packs roughly 4 grams of protein. This isn’t a meal on its own but can be a fantastic complement to your favorite toppings, like Turkey Bacon or even Chicken Ham, to boost the overall protein content of your meal.
Sodium
When keeping an eye on sodium, you’ll find that a serving has about 200 milligrams. That’s quite manageable within most dietary guidelines, but if you’re watching your salt intake, consider adjusting your toppings accordingly.
For more detailed nutritional guidelines, you might be interested in exploring resources like MyFitnessPal or USDA FoodData Central to get a fuller picture of what goes into your meal.
If you’re keen on making your own Dutch Oven French Bread, understanding these nutritional facts can definitely enhance your cooking experience. After all, it’s about striking a balance between enjoying our meals and maintaining a healthy lifestyle!
FAQs about Dutch Oven French Bread
Can I use all-purpose flour instead of bread flour?
Yes, you can certainly substitute all-purpose flour for bread flour in your Dutch Oven French Bread recipe. However, you might notice a slight difference in texture. Bread flour has a higher protein content, resulting in a chewier crust and a more structured crumb. If you use all-purpose flour, you may end up with a softer loaf. For beginners, all-purpose flour is often easier to work with, so don’t hesitate to give it a try!
What can I do if my bread is too dense?
If your Dutch Oven French Bread turns out dense, don’t worry; it happens to the best of us! Here are a few tips to improve your next batch:
- Check your yeast: Make sure your yeast is fresh and active. Expired yeast can lead to poor rise.
- Kneading: Ensure you knead the dough well. Good gluten development is crucial for a light texture.
- Hydration: A little extra hydration can work wonders. You might need to add a bit more water to your dough next time.
For more tips on achieving the perfect bread, the experts at King Arthur Baking offer excellent resources.
How should I store leftover bread?
Leftover Dutch Oven French Bread can quickly lose its lovely crust if not stored properly. To keep your bread fresh:
- Wrap it in a kitchen towel to maintain moisture.
- If you plan to keep it for more than a few days, slice it and place it in an airtight container or zip-top bag to prevent staleness.
For longer storage, consider freezing your bread. Just ensure it’s well-wrapped to avoid freezer burn. When you’re ready to enjoy, simply thaw it at room temperature or pop it in the oven for a quick refresh.
Conclusion on Dutch Oven French Bread
Recap of the Joy of Homemade Bread
There’s something uniquely rewarding about the allure of Dutch Oven French Bread. The warm, crusty exterior gives way to a soft, airy interior, creating an experience that takes you straight to a cozy French bakery. Making this bread at home is an adventure; it brings the joy of baking right into your kitchen, allowing you to savor each moment.
Imagine biting into your fresh loaf, perhaps with a spread of your favorite herb-infused butter or paired with a comforting soup! You’re not just creating bread; you’re building memories and honing a skill that will impress friends and family alike.
As you refine your Dutch Oven French Bread technique, you’ll find that experimenting with different flours or adding flavors can make each loaf uniquely yours. If you’re looking for further inspiration, check out resources like King Arthur Baking for tips on variations and techniques.
Happy baking!
PrintDutch Oven French Bread Made Easy for Delicious Homemade Meals

Learn how to make Dutch Oven French Bread easily from scratch for your delicious homemade meals.
- Prep Time: 15 minutes
- Cook Time: 45 minutes
- Total Time: 18 hours
- Yield: 1 loaf 1x
- Category: Bread
- Method: Baking
- Cuisine: French
- Diet: Vegetarian
Ingredients
- 3 cups all-purpose flour
- 1 ½ teaspoons salt
- 1 teaspoon instant yeast
- 1 ½ cups warm water
Instructions
- In a large bowl, mix flour, salt, and instant yeast.
- Add warm water and stir until a shaggy dough forms.
- Cover the bowl with plastic wrap and let it rest for 12 to 18 hours.
- After resting, turn the dough onto a floured surface and shape it into a round loaf.
- Preheat your oven along with the Dutch oven inside it.
- Carefully place the dough in the hot Dutch oven and cover.
- Bake for 30 minutes covered and then 15 minutes uncovered until golden brown.
Notes
- Let the bread cool completely before slicing for best texture.
- Experiment with adding herbs or cheeses for different flavors.
Nutrition
- Serving Size: 1 slice
- Calories: 120
- Sugar: 0g
- Sodium: 300mg
- Fat: 1g
- Saturated Fat: 0g
- Unsaturated Fat: 0g
- Trans Fat: 0g
- Carbohydrates: 24g
- Fiber: 1g
- Protein: 4g
- Cholesterol: 0mg
Keywords: Dutch Oven French Bread, homemade bread, easy bread recipe