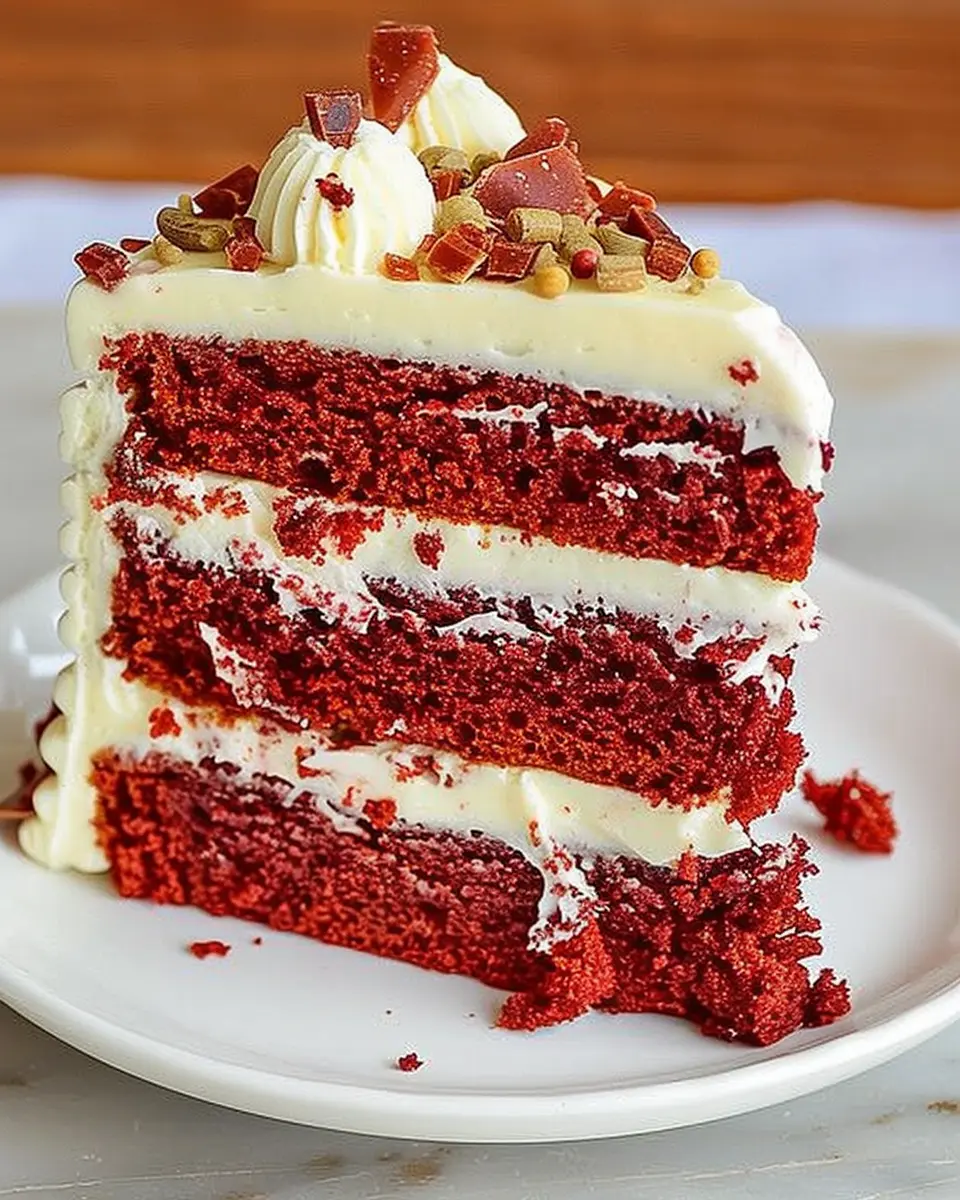
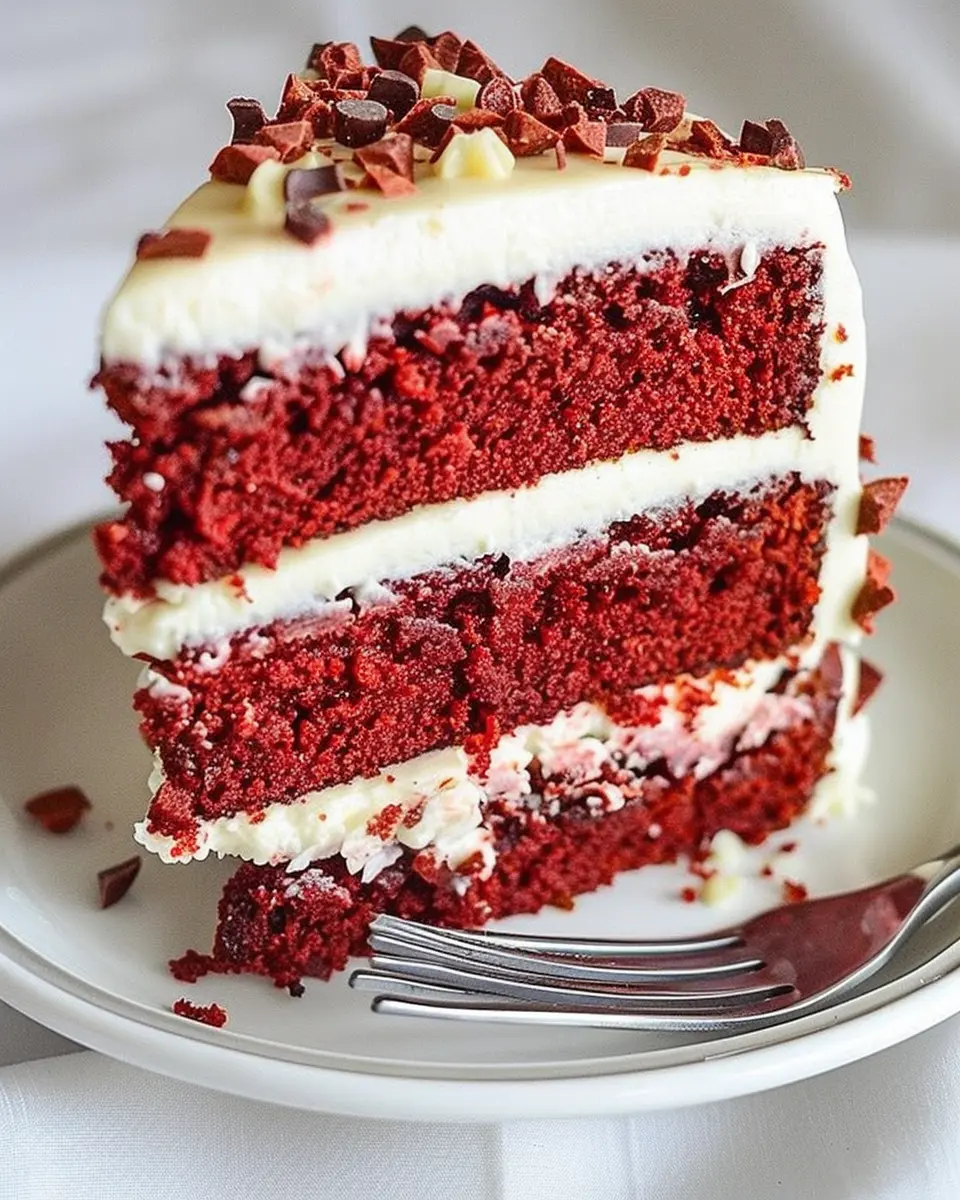
Introduction to The Best Red Velvet Cake
When it comes to desserts that leave a lasting impression, the best red velvet cake stands out. This rich, velvety treat is not only a feast for the eyes but also a delight for your taste buds. If you’re a young professional navigating the busy world of work-life balance, the sophistication of red velvet cake can elevate any moment. Whether you’re celebrating a personal achievement or simply indulging after a long week, this cake is a must-try.
Why Red Velvet Cake Is a Must-Try for Young Professionals
So, why should you prioritize the best red velvet cake over other dessert options? For starters, it strikes the perfect balance between taste and elegance. The striking red color, contrasted with creamy white frosting, makes it visually stunning—ideal for impressing friends or colleagues at gatherings. And let’s be real, nothing feels quite as rewarding as treating yourself to a piece of cake after a productive day.
Moreover, this cake is surprisingly easy to make. In less than an hour, you can have a decadent dessert ready to share or savor solo. The ingredients are relatively common, consisting mainly of flour, cocoa powder, buttermilk, and a touch of red food coloring. For those looking to swap out ingredients or simplify recipes, you can find countless variations online.
In addition, the flavors of the best red velvet cake add an unexpected twist to traditional desserts. The hint of cocoa gives it a deeper flavor profile, while the tanginess from the buttermilk lends a refreshing contrast. This combination can spark joy and nostalgia, reminiscent of special celebrations from childhood, making it the perfect way to connect with friends or family over a slice.
Whether you’re planning a weekend brunch or simply craving something sweet during your Netflix binge-watching session, red velvet cake fits the bill perfectly. Plus, many bakers and chefs have shared their unique takes on this classic, so don’t hesitate to explore various recipes for inspiration—check out reliable sources such as Food Network for innovative twists!
With the best red velvet cake in your baking repertoire, you’ll always have a showstopper dessert at your fingertips.
Ingredients for The Best Red Velvet Cake
Essential ingredients for an unforgettable flavor
Creating The Best Red Velvet Cake requires more than just a desire for a delicious treat; it’s about using the right ingredients to achieve that signature flavor and texture. Here’s what you’ll need:
- All-purpose flour: This is your base, giving the cake structure while keeping it tender.
- Granulated sugar: Sweetness is key, and it balances the tanginess from the buttermilk.
- Unsweetened cocoa powder: Just a bit adds depth, enhancing the chocolate notes without overpowering the vanilla.
- Baking soda & baking powder: These leavening agents ensure your cake rises beautifully.
- Vegetable oil: For a moist cake, oil is crucial; it keeps things luscious without making them heavy.
- Buttermilk: This ingredient introduces a tender crumb and that slight tanginess we all love in red velvet.
- Eggs: They bind everything together, adding moisture and richness.
- Vinegar: Just a splash brightens the flavors and helps with leavening.
- Red food coloring: Of course, to achieve that vibrant red hue.
Using these essential ingredients not only ensures that your cake looks stunning but also that it tastes out of this world. For more expert tips on baking cakes, check out resources like Serious Eats, where they delve deep into culinary secrets.
Now that you have your ingredient list, you’re one step closer to impressing your friends and family with this iconic dessert!
Preparing The Best Red Velvet Cake
Baking the best red velvet cake is easier than you might think! With its rich, velvety texture and striking color, this cake is a showstopper for any occasion. Let’s walk through the steps to craft this iconic dessert, ensuring it’s both delightful and delicious.
Gather your ingredients and equipment
Before diving into the baking process, it’s crucial to assemble all your ingredients and equipment. Here’s what you’ll need:
-
Ingredients:
-
2 ½ cups all-purpose flour
-
1 ½ cups granulated sugar
-
1 teaspoon baking soda
-
1 teaspoon salt
-
1 teaspoon cocoa powder
-
1 ½ cups vegetable oil
-
1 cup buttermilk
-
2 large eggs
-
2 tablespoons red food coloring
-
1 teaspoon vanilla extract
-
1 teaspoon white vinegar
-
Equipment:
-
Two 9-inch round cake pans
-
Mixing bowls
-
Electric mixer or whisk
-
Measuring cups and spoons
-
Parchment paper
Gather everything upfront to help streamline your baking experience.
Preheat the oven and prepare your pans
Before mixing your ingredients, preheat your oven to 350°F (175°C). While it warms up, take a moment to prepare your cake pans by greasing them with butter or cooking spray, then lining the bottoms with parchment paper. This step ensures your cakes come out smoothly, making the finished product even more appealing!
Combine the dry ingredients
Now it’s time to focus on the dry ingredients. In a large mixing bowl, whisk together:
- All-purpose flour
- Sugar
- Baking soda
- Salt
- Cocoa powder
Make sure these ingredients are well-combined. This step is essential for ensuring that the flavors intermingle properly throughout the cake. Did you know that using a whisk instead of a spoon allows for better aeration? Beginners and experienced bakers alike can benefit from this tip!
Mix the wet ingredients for that signature color
In another bowl, it’s time to mix the wet ingredients. Combine:
- Vegetable oil
- Buttermilk
- Eggs
- Red food coloring
- Vanilla extract
- Vinegar
Stir the mixture gently but thoroughly. You’ll notice that the red food coloring gives this mixture a vibrant hue, setting the stage for that classic red velvet cake aesthetic.
Incorporate the dry ingredients with care
Now, slowly incorporate the dry ingredients into the wet mixture. You want to do this carefully and avoid overmixing. Overmixing can lead to a denser cake, while a gentle hand will keep the texture light and fluffy. Just mix until the ingredients are combined, and small lumps remain.
Bake to perfection and cool the cakes
Pour the batter evenly into your prepared pans and bake for about 25–30 minutes, or until a toothpick inserted in the center comes out clean. Don’t forget to keep an eye on them! Once baked, allow the cakes to cool in the pans for 10 minutes before transferring them to a wire rack. This helps prevent any sticking and guarantees a fantastic presentation.
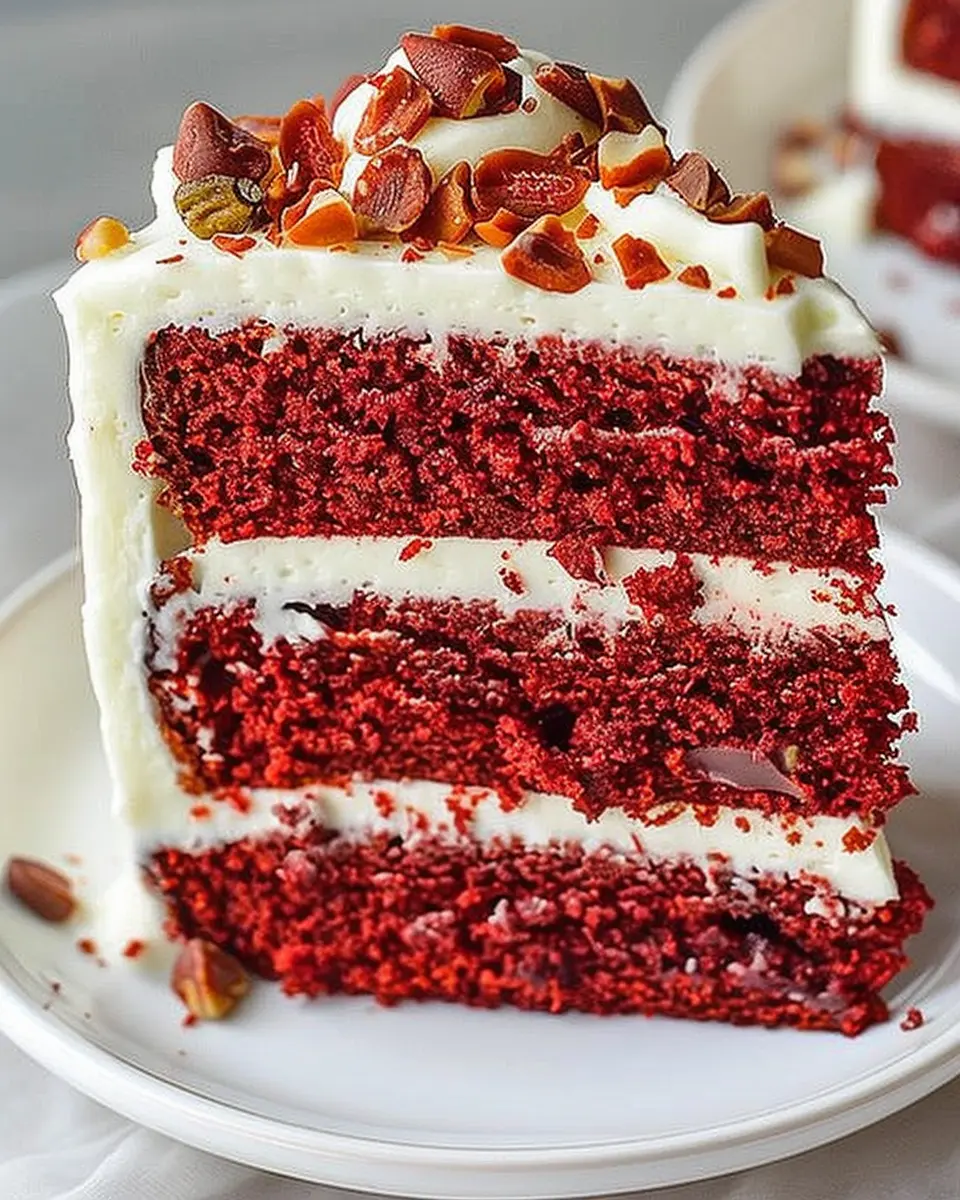
Frosting the layers for a rich finish
While the cakes are cooling, it’s time to tackle the frosting. A classic cream cheese frosting pairs beautifully with the best red velvet cake. You can make your own or use a store-bought version. If making your own, mix cream cheese, butter, powdered sugar, and vanilla extract until smooth.
Once the cakes have completely cooled, place one layer on your serving plate, spread a generous amount of frosting over the top, and repeat with the second layer. Add a final coat of frosting around the sides for a polished look.
Now you have a stunning cake that’s not only visually appealing but also mouth-wateringly delicious. Whether you’re serving it at a party or indulging in a slice after a long day, the best red velvet cake is sure to impress. Enjoy every bite, and don’t be surprised when everyone asks for your secret!

Variations on The Best Red Velvet Cake
Gluten-free Red Velvet Cake Alternative
If you’re on a gluten-free diet, fear not! You can still enjoy the best red velvet cake with a few simple tweaks. Substitute all-purpose flour with a gluten-free blend—look for one that includes xanthan gum for better texture. Many brands advertise their blends as one-to-one substitutes, making it easy to switch. Check out resources like King Arthur Baking for great gluten-free options. You’ll find that the rich color and velvety texture can still shine through, ensuring you don’t miss a beat on taste.
Mini Red Velvet Cupcakes for Portion Control
Sometimes you just want a little indulgence without the full commitment of a slice. That’s where mini red velvet cupcakes come in, presenting an adorable and manageable option! Use the same batter from the best red velvet cake recipe, just pour it into mini cupcake liners. Bake for about 12-15 minutes and you’ll have bite-sized delights that are perfect for gatherings or satisfying a sweet tooth in moderation.
Consider frosting these little gems with a rich cream cheese icing, which balances the cake’s deep cocoa flavor beautifully. A sprinkle of crushed walnuts or pecans can add a delightful crunch. For more ideas, you can visit Taste of Home for inspiration on mini cupcakes that can steal the show at any party.
Whether you’re gluten-free or just looking for something small, these variations ensure that everyone can partake in the joy of red velvet cake. Why not try both options for your next gathering and watch everyone delight in the deliciousness?
Baking notes for The Best Red Velvet Cake
Tips for ensuring moist cake layers
Creating The Best Red Velvet Cake means achieving that perfect, moist texture that keeps everyone coming back for seconds. Here are some tips to ensure your cake layers turn out deliciously moist:
-
Use Buttermilk: It’s a classic ingredient for a reason! The acidity in buttermilk helps tenderize gluten, resulting in a softer crumb. If you don’t have any on hand, a mix of milk and vinegar can work in a pinch.
-
Don’t Overmix: Once you combine your wet and dry ingredients, mix just until incorporated. Overmixing can lead to a dense cake instead of a light, airy one.
-
Check Your Oven Temperature: Ovens can be tricky! Make sure yours is calibrated correctly, as a too-hot oven can dry out your cake. A great kitchen tool is an oven thermometer for accurate baking temperatures.
-
Keep It Covered: After baking, allow your layers to cool completely, then cover them to lock in moisture. This prevents them from drying out as they cool.
Baking is all about experimenting, so don’t hesitate to adjust the recipe or these tips to suit your style. For more tips on achieving fluffy cakes, you can check resources like Epicurious. Happy baking!
Serving suggestions for The Best Red Velvet Cake
When it comes to serving The Best Red Velvet Cake, creativity is key! This iconic dessert is perfect not just for everyday indulgence, but also for special occasions. Here are some delightful ideas to elevate your baking experience:
Creative Ways to Serve It Up
-
Layered Delights: Instead of the traditional single cake, try creating mini layer cakes. Stack them in mason jars for a fun, portable dessert option perfect for gatherings.
-
Cake Pops: Transform leftover cake into cake pops! The kids (and adults!) will love this fun twist, and they make for an attractive dessert table centerpiece.
-
Ice Cream Pairing: Serve slices of Red Velvet Cake with a scoop of vanilla ice cream or cream cheese ice cream. The combination of warm cake and cold ice cream is simply divine!
-
Garnish with Fresh Fruit: Top the cake with berries like raspberries or strawberries. The fruity tartness complements the richness of the cake wonderfully.
-
Breakfast Treats: Craving something sweet in the morning? Serve slices with a side of turkey bacon for a decadent brunch twist!
Remember to adjust your serving plates and display for a visual treat. For more ideas, check out blogs like The Cake Blog for inspiration!
Cooking tips for The Best Red Velvet Cake
When baking The Best Red Velvet Cake, it’s easy to encounter a few obstacles. Here are some tips to help you navigate the process seamlessly.
Avoiding common pitfalls in the baking process
-
Measure Ingredients Accurately
Baking is a science—and precision is key! Use a kitchen scale for dry ingredients and liquid measuring cups for wet ones. This ensures that your cake has the ideal texture and taste. -
Room Temperature Ingredients
Make sure your butter, eggs, and buttermilk are at room temperature before mixing. This helps create a smoother batter and contributes to the cake’s fluffiness. -
Don’t Overmix the Batter
Once you combine your wet and dry ingredients, mix just until combined. Overmixing can lead to a dense cake instead of the light, airy texture we all love. -
Watch Your Baking Time
Every oven is different. Start checking your cake a few minutes before the recommended baking time. Use a toothpick; if it comes out clean or with a few crumbs, your cake is ready! -
Cooling Matters
Let your cake cool in the pan for about 10 minutes before transferring it to a wire rack. This will prevent it from sticking, ensuring a beautiful presentation.
With these tips in hand, your journey to baking The Best Red Velvet Cake will be smooth and enjoyable. For even more inspiration, you might want to check out this baking guide on achieving perfect cakes every time!
Time details for The Best Red Velvet Cake
Preparation time
Making The Best Red Velvet Cake is a delightful experience that starts with a prep time of about 20 minutes. Gather your ingredients like cocoa powder and buttermilk, and you’ll be ready to whip up a batter that’s as vibrant as it is flavorful.
Baking time
Once prepped, you’ll place the cake in the oven for approximately 30 to 35 minutes. It’s the perfect time to tidy up your kitchen or prepare your frosting—after all, a red velvet cake is only as good as its cream cheese topping!
Total time
In total, you’re looking at around an hour for this recipe. Between preparation and baking, you’ll have a delectable Red Velvet Cake relatively quickly, allowing you to enjoy a mouthwatering dessert any day of the week. Interested in making your baking even easier? Check out resources from King Arthur Baking for tips on improving your baking skills.
Nutritional Information for The Best Red Velvet Cake
Calories Per Serving
Indulging in The Best Red Velvet Cake doesn’t have to come with guilt! Each slice packs approximately 350 calories. While satisfying your sweet tooth, this cake brings a touch of elegance to your dessert table.
Breakdown of Main Nutrients
When you savor a slice of The Best Red Velvet Cake, you’re also treating your body to a delightful mix of nutrients:
- Carbohydrates: About 50 grams, providing energy for your busy day.
- Fats: Roughly 15 grams, crucial for hormone production and nutrient absorption.
- Protein: Contains around 4 grams to help you feel full and support muscle maintenance.
- Fiber: While it’s a dessert, you can still enjoy some dietary fiber, contributing to better digestion.
For a deeper dive into the nutritional benefits of cake ingredients, you might find this article on healthy baking helpful. Balancing indulgence with nutrition is achievable, and knowing what’s in your favorite treats can empower your choices!
FAQs about The Best Red Velvet Cake
What can I use instead of buttermilk?
If you find yourself without buttermilk, fear not—there are several easy substitutes you can use for The Best Red Velvet Cake! Some great options include:
- Milk + Vinegar or Lemon Juice: Add 1 tablespoon of vinegar or lemon juice to a cup of milk. Let it sit for about 5 minutes until it curdles slightly.
- Yogurt: You can thin plain yogurt with some water in a 1:1 ratio to mimic buttermilk’s consistency.
- Sour Cream: Similar to yogurt, sour cream can be thinned with water or milk to achieve the right texture.
These alternatives not only maintain moisture but also help achieve that distinct tanginess!
Can I make this cake ahead of time?
Absolutely! The Best Red Velvet Cake can be made ahead of time. You can bake the layers a day or two in advance and store them wrapped in plastic wrap at room temperature. If you want to keep them fresh for a longer time, consider freezing the layers. Just make sure to wrap them well to avoid freezer burn.
How do I store the leftover cake?
Storing leftover cake properly is key to maintaining its moistness. Here are some tips:
- Refrigerate: If you have any cake left, cover it with plastic wrap or store it in an airtight container. It should last about 3-4 days in the refrigerator.
- Freeze: For longer storage, freeze individual slices in a single layer, then move to a freezer-safe container or wrap in foil for up to 3 months. Let it thaw in the fridge overnight when you’re ready to enjoy it again.
Curious to know more about cake storage? Check out this helpful guide for expert tips! Enjoy your baking!
Conclusion on The Best Red Velvet Cake
Why you need to try making this cake at home today
If you’ve ever craved an unforgettable dessert, The Best Red Velvet Cake is your answer. This cake boasts a unique flavor profile, combining rich cocoa with a hint of tanginess from buttermilk, resulting in a delightful experience that can’t be found in store-bought versions. Plus, making this classic cake from scratch allows you to control the ingredients, ensuring freshness and quality. Why settle for mediocre when you can impress your friends with a homemade masterpiece?
For tips on elevating your baking skills further, check out this baking guide. So, grab your spatula and whisk—it’s time to embark on a delicious baking adventure!
PrintThe Best Red Velvet Cake: An Easy Indulgence for Everyone
The Best Red Velvet Cake is a deliciously moist and tender cake that everyone will love.
- Prep Time: 20 minutes
- Cook Time: 30 minutes
- Total Time: 50 minutes
- Yield: 12 servings 1x
- Category: Desserts
- Method: Baking
- Cuisine: American
Ingredients
- 2 cups all-purpose flour
- 1 1/2 cups granulated sugar
- 1 teaspoon baking soda
- 1 teaspoon salt
- 1 teaspoon cocoa powder
- 1 cup vegetable oil
- 1 cup buttermilk, room temperature
- 2 large eggs, room temperature
- 2 tablespoons red food coloring
- 1 teaspoon vanilla extract
- 1 teaspoon white vinegar
Instructions
- Preheat the oven to 350°F (175°C). Grease and flour two 9-inch round cake pans.
- In a large bowl, whisk together the flour, sugar, baking soda, salt, and cocoa powder.
- In another bowl, combine the oil, buttermilk, eggs, food coloring, vanilla, and vinegar.
- Gradually add the wet ingredients to the dry ingredients, mixing until just combined.
- Divide the batter evenly between the prepared pans.
- Bake for 25-30 minutes or until a toothpick inserted into the center comes out clean.
- Let the cakes cool in the pans for 10 minutes before transferring them to a wire rack to cool completely.
Notes
- For an extra touch, frost with cream cheese frosting.
- Make sure all ingredients are at room temperature for the best results.
Nutrition
- Serving Size: 1 slice
- Calories: 350
- Sugar: 25g
- Sodium: 250mg
- Fat: 15g
- Saturated Fat: 2g
- Unsaturated Fat: 10g
- Trans Fat: 0g
- Carbohydrates: 48g
- Fiber: 1g
- Protein: 6g
- Cholesterol: 40mg
Keywords: Red Velvet Cake, Dessert, Baking