Introduction to Pencil Wafer Cookies
If you’ve ever found yourself searching for a delightful treat to satisfy your sweet tooth, look no further than pencil wafer cookies. These delightful cookies offer a unique crispy texture and a light, airy flavor that keeps you coming back for more. Whether you’re grabbing a quick snack during a busy workday or hosting a gathering with friends, these cookies are incredibly versatile and fun!
Why Pencil Wafer Cookies are the Perfect Treat
So, what makes pencil wafer cookies stand out among the sea of baked goodies? For starters, they’re incredibly easy to make! With just a handful of ingredients like flour, butter, and sugar, you can whip these up in no time. Pencil wafer cookies are also highly adaptable—feel free to incorporate your favorite flavors, like vanilla or cocoa, to cater to your taste buds.
You might be wondering, how do they compare to traditional cookies? An interesting factor is their crispy texture, which sets them apart. Unlike many cookies, pencil wafer cookies deliver a satisfying crunch with each bite, making them perfect for dipping in coffee or milk. Speaking of coffee, a delicious cup could be the perfect complement to these cookies, providing a nice balance to their sweetness.
Did you know that baking as a hobby can actually boost your mood? According to a study by the Journal of Positive Psychology, engaging in creative activities like cooking can lead to increased happiness and fulfillment. So, baking pencil wafer cookies not only satisfies your cravings but also gives your mental well-being a nice boost.
These cookies are also a hit at parties and family gatherings. Thanks to their delectable crunch and light flavor, everyone will be asking for seconds. Imagine serving them with a side of whipped cream or fresh fruit for a charming dessert.
In summary, pencil wafer cookies are not just treats; they’re an experience. Easy to make, enjoyable to eat, and perfect for any occasion, they just might become your new favorite cookie. If you’re ready to delve into this delightful concoction, let’s get started on the recipe!
Essential Ingredients for Your Pencil Wafer Cookies
When it comes to baking pencil wafer cookies, the right ingredients can make all the difference in achieving that perfect crunch and delightful flavor. Here’s a quick rundown of what you’ll need:
-
Pencil Wafers: These are the star of the show! You can find them at most grocery stores or even online at specialty shops.
-
Creamy Peanut Butter: A classic choice that pairs wonderfully with the wafers, giving your cookies a rich, nutty flavor that’s hard to resist.
-
Sugar: Granulated sugar will add the right amount of sweetness, balancing perfectly with the saltiness of the wafers.
-
Butter (or Coconut Oil): For a chewy texture, softened butter is best. If you’re looking for a dairy-free option, coconut oil works just as well.
-
Vanilla Extract: A dash of this fragrant essence enhances the flavors and adds a nice depth to your cookies.
-
Chocolate Chips or Sprinkles: This is where you can let your creativity shine. Use semi-sweet chocolate chips for a classic combo or colorful sprinkles to bring some fun to your baking.
Feel free to explore more about these ingredients on websites like Food Network or Serious Eats. Now that you have your list, let’s get baking those delightful pencil wafer cookies!
Step-by-Step Preparation of Pencil Wafer Cookies
Creating delicious pencil wafer cookies doesn’t have to be daunting. With a little preparation and some simple steps, you can whip up these delightful treats that not only taste good but also look adorable! Let’s dive into the preparation process so you can impress your friends and family with your baking skills.
Gather Your Supplies
Before you start the journey of baking pencil wafer cookies, it’s essential to gather all your ingredients and supplies. Here’s what you’ll need:
-
Ingredients:
-
Vanilla wafer cookies
-
Pink candy melts
-
White chocolate chips
-
Optional sprinkles for decoration
-
Supplies:
-
Baking sheet
-
Parchment paper
-
Microwave-safe bowl
-
Piping bag or zip-top bag
-
Toothpicks (for decoration, if desired)
Having everything at hand will streamline your baking process, allowing you to focus on the fun of creating these whimsical cookies!
Prepare Your Work Surface
Next, set up your work area to ensure a smooth cooking experience. A clean and organized workspace serves as both a safety measure and a way to enhance your creativity. Here’s how to do it:
- Clear your countertop or table of any clutter and sanitize the surface.
- Line your baking sheet with parchment paper; this prevents sticking and makes for easy cleanup.
- Place your supplies within easy reach so you can grab them as you go along.
Taking these steps not only makes things easier but also adds an element of joy to your cooking experience.
Shape the Vanilla Wafer Cookies
Now, let’s get to the fun part: shaping the cookies! This step involves using vanilla wafers to create the base of your pencil wafer cookies. Here’s how:
- Choose Your Cookie Size: Decide how large you want your cookies to be. A typical size is about 3 inches long.
- Begin Shaping: Lay the vanilla wafers on the parchment-lined baking sheet, positioned for stability.
- Creating the Pencil Look: You can slightly narrow one end of the wafers if you wish. This will enhance the pencil appearance.
Remember, it’s all about having fun and creating something delightful, so don’t stress about perfection!
Melt the Pink Candy Melts
The next step is crucial as it involves melting the pink candy melts, which will provide the vibrant color to make your pencil wafer cookies stand out. Here’s how to go about it:
- Use a microwave-safe bowl and pour in your pink candy melts.
- Microwave in 30-second intervals, stirring in between until fully melted and smooth.
- If you find the candy is too thick, add a small amount of vegetable oil to achieve your desired consistency.
Melted candy creates a lovely coating that transforms your cookies into stunning treats.
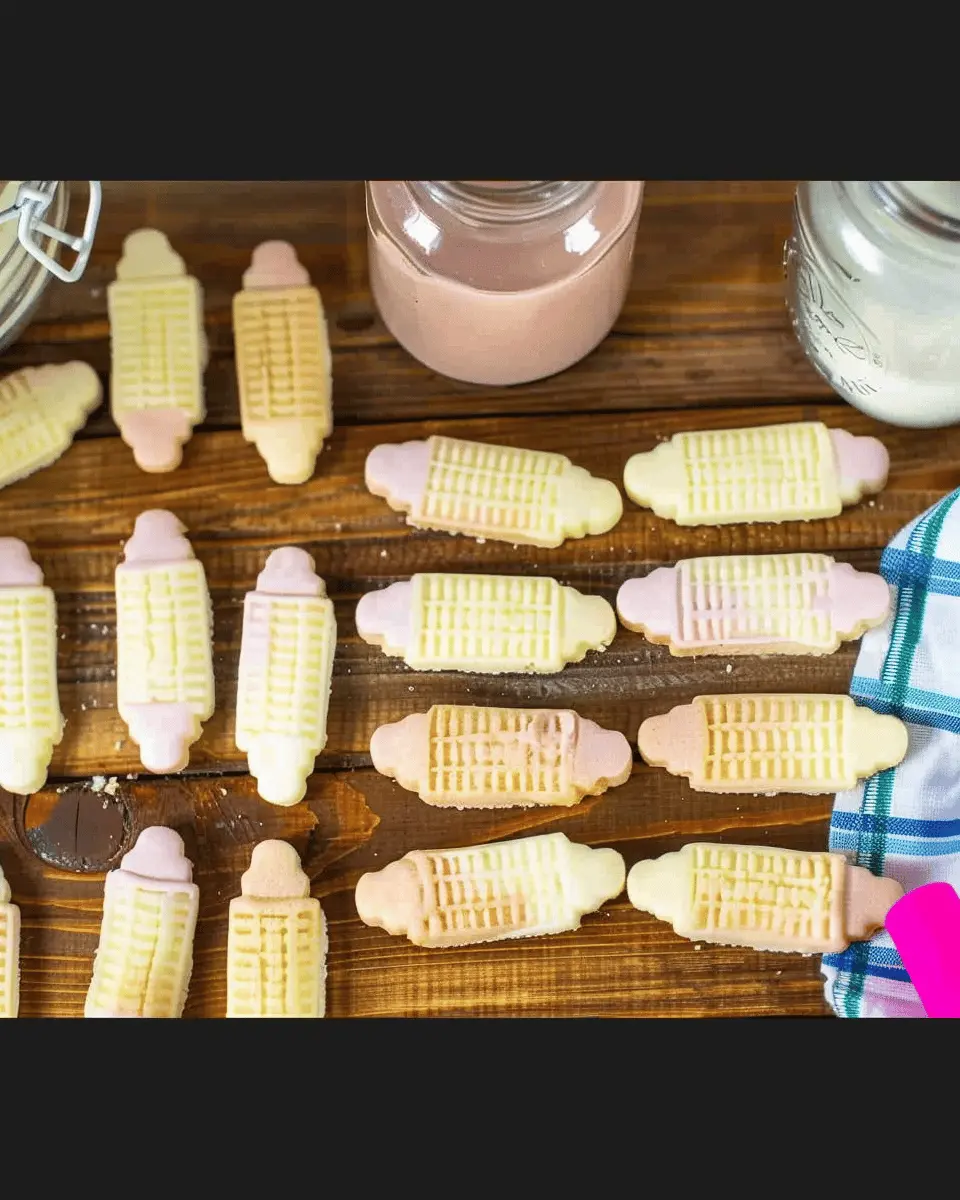
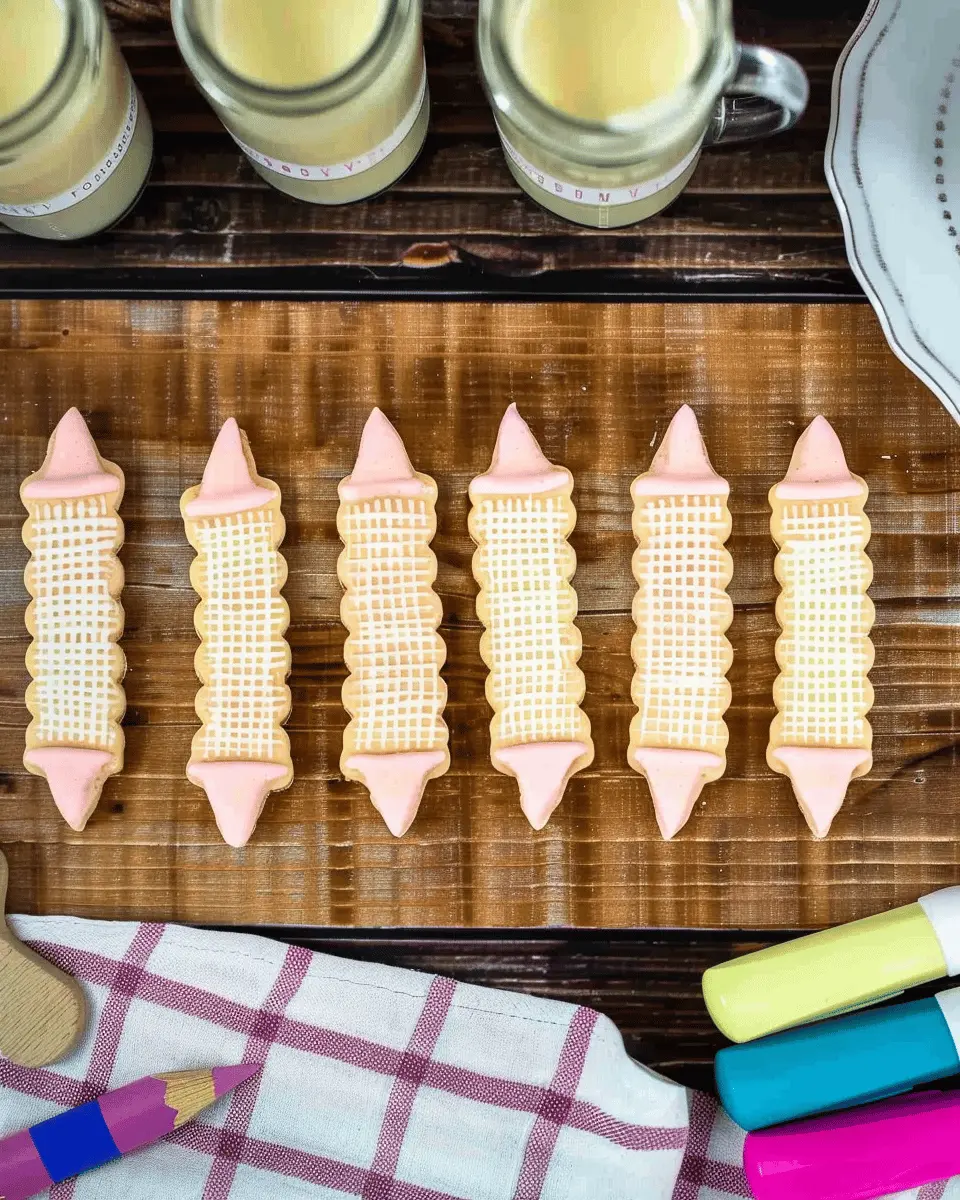
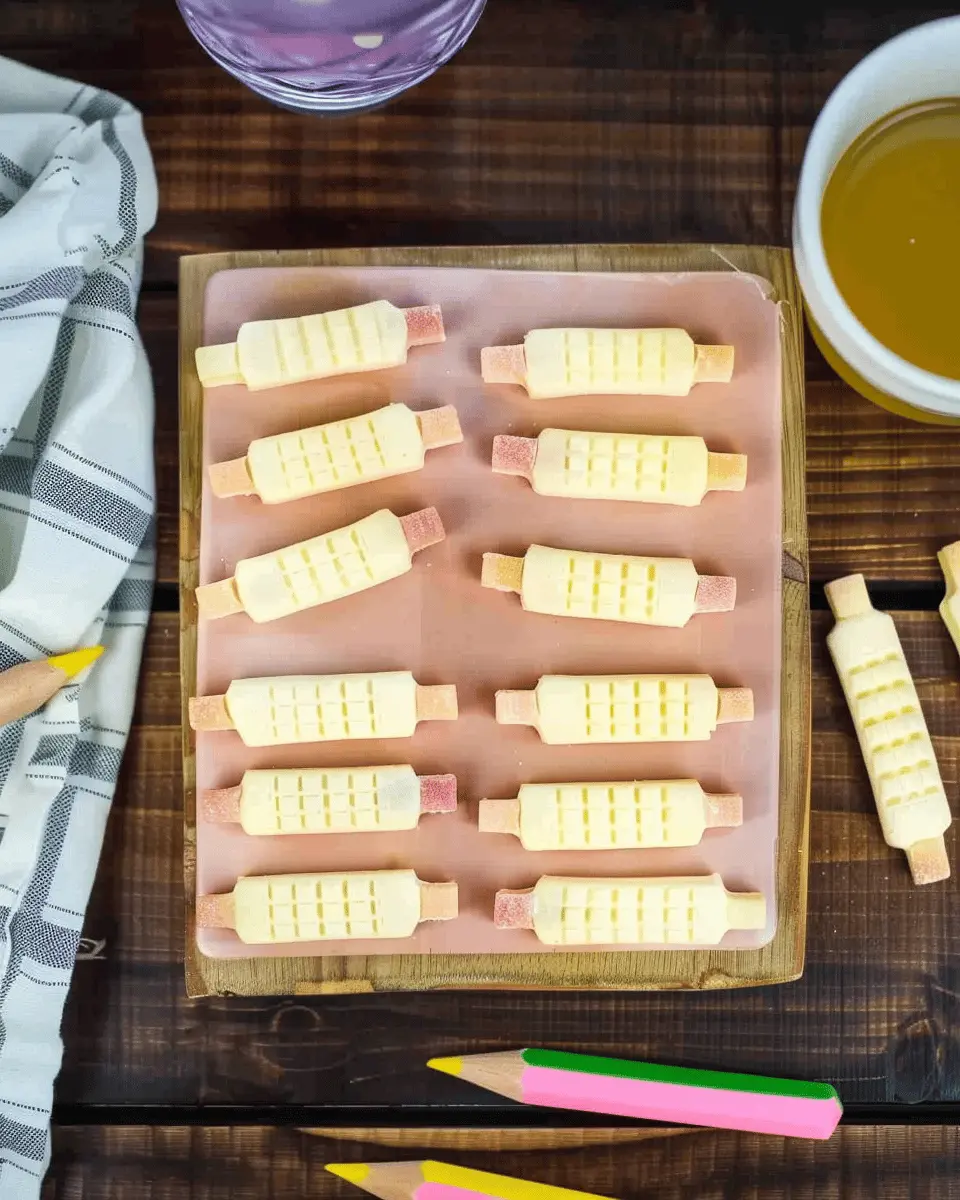
Dip and Decorate the Cookies
Now it’s time to dip those cookies into the melted pink candy! This truly brings your pencil wafer cookies to life. Here’s how:
- Hold a cookie by one end and dip it into the pink candy melt, ensuring an even coating.
- Allow any excess to drip off before placing it back on the parchment.
- If desired, sprinkle any decorations on top while the pink candy is still wet.
Let your creativity shine here—use different toppings or even a variety of colored melts for a fun twist!
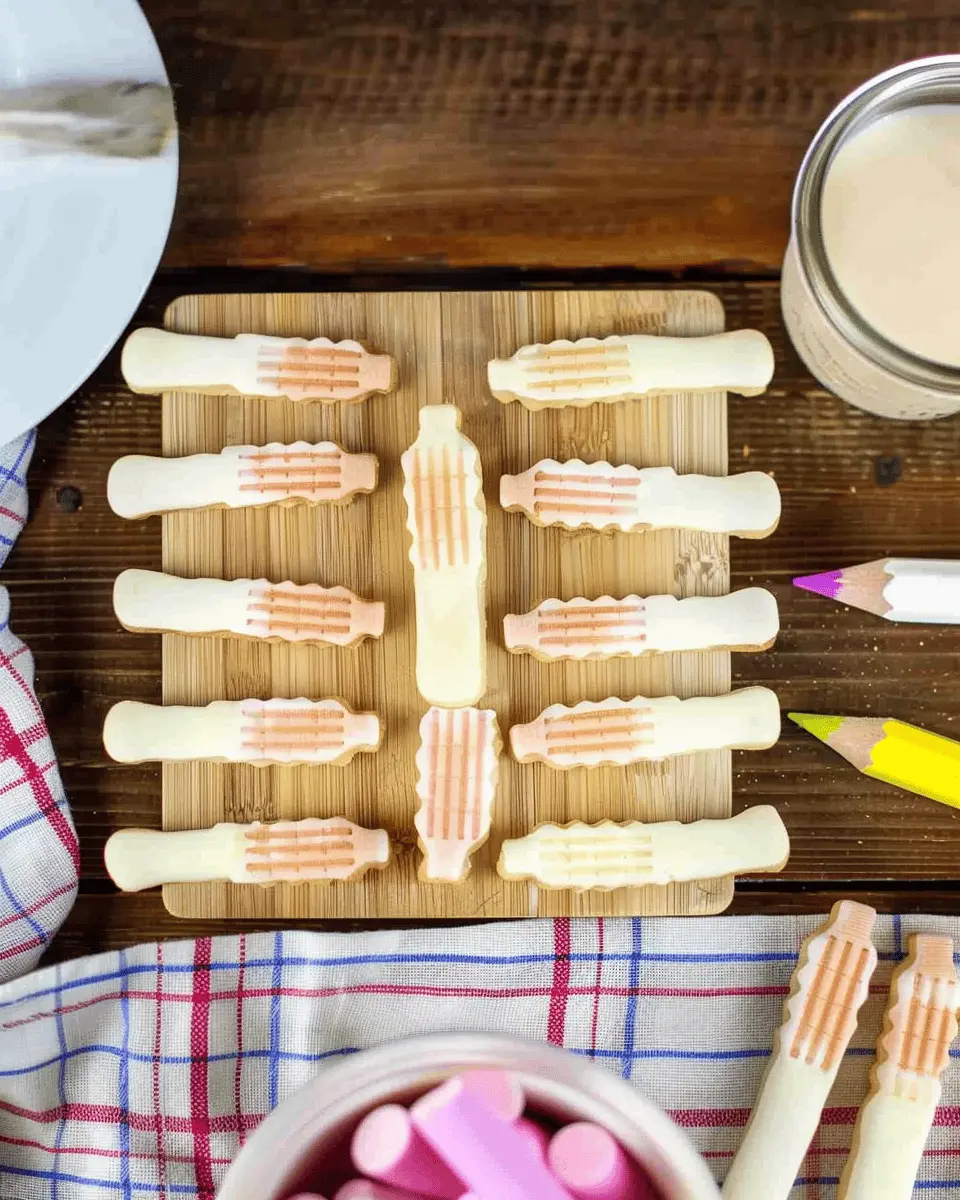
Final Touches with White Chocolate
To complete your pencil wafer cookies and add a professional touch, you’ll finish them with melted white chocolate. This will represent the pencil tip or eraser. Follow these steps:
- Melt the white chocolate chips using the same method as the pink melts.
- Use a piping bag or zip-top bag with a corner snipped to drizzle the melted white chocolate over the cookies. You can create stripes or dots for added flair.
- Allow everything to set completely at room temperature—this will give your cookies a delightful crunch and finish.
And there you have it! Your homemade pencil wafer cookies are ready to be savored or shared. These cookies are perfect for parties, gifts, or simply a fun afternoon treat. Happy baking!
Variations on Pencil Wafer Cookies
Pencil wafer cookies are wonderfully versatile treats, perfect for impressing guests or just indulging yourself. One way to elevate these delightful cookies is through a splash of color and a hint of new flavors.
Colorful Pencil Wafer Cookies
Who says cookies have to be beige? Adding a splash of color not only makes your pencil wafer cookies aesthetically pleasing but also adds a fun twist. Here are some ideas to get you started:
- Use Food Coloring: Divide your cookie batter into portions and mix in different colors. Aim for pastel hues for a subtle approach or bold shades for eye-catching cookies.
- Decorative Sprinkles: After layering your cookies, roll them in colorful sprinkles before chilling. It’s an easy way to add texture and flair.
Check out popular baking blogs like Sally’s Baking Addiction for tips on achieving vibrant cookie colors.
Add Flavor to Your Pencil Cookies
Feeling adventurous? Infusing your pencil wafer cookies with unique flavors can turn them into a signature treat. Here are some flavorful enhancements:
- Spices: Consider adding cinnamon, nutmeg, or even a pinch of cardamom for warmth. These spices can elevate your cookies into a cozy dessert.
- Extracts and Zests: A dash of vanilla, almond extract, or grated lemon zest can offer a delightful twist. Just remember, a little goes a long way!
By playing around with colors and flavors, your pencil wafer cookies will not only taste incredible but also look mesmerizing. So, what variation will you try first? Experiment, and you might just stumble upon your new favorite cookie creation!
Cooking Tips and Notes for Pencil Wafer Cookies
Tools to Make Your Life Easier
Making pencil wafer cookies can be both simple and fun, especially with the right tools at hand. Here’s what you’ll need to streamline your cookie-making process:
-
Silicone Baking Mats: These non-stick mats can help ensure your cookies come off easily without sticking, allowing for a perfect bake every time. Learn more about the benefits of silicone mats here.
-
Rolling Pin with Thickness Guides: A rolling pin with adjustable thickness rings will help you achieve even, uniform cookies, ensuring they bake evenly and look gorgeous.
-
Piping Bag and Tips: If you plan to decorate your cookies with fillings or glazes, a piping bag is a must. It provides precision and control for beautiful designs.
-
Cooling Racks: Don’t skip on these; they allow air to circulate around your pencil wafer cookies, promoting even cooling and preventing sogginess.
Remember, the right tools not only make life easier but can also elevate your cookie game, turning a basic recipe into a delightful treat! Happy baking!
Serving Suggestions for Pencil Wafer Cookies
Creative Ways to Present Your Cookies
When it comes to serving your delightful pencil wafer cookies, presentation makes all the difference. Here are some fun and creative ideas to jazz up your cookie display:
-
Cookie Stacks: Create appealing stacks of pencil wafer cookies for a charming visual effect. Use a mix of colorful fillings between the layers like frosting or fruit preserves to entice your guests.
-
Dessert Charcuterie Board: Incorporate your cookies into a dessert board alongside fruits, nuts, and cheeses (like a mild goat cheese) for an elegant touch. This not only showcases the cookies but also adds a vibrant variety to your dessert offerings.
-
Gift Tins: If you’re preparing to share the love, consider packing some pencil wafer cookies in decorative tins or boxes. A touch of personal flair with customized labels or a handwritten note can make the gift even more special.
-
Pairing Suggestions: Serve your cookies with a nice herbal tea or even a scoop of vanilla ice cream on the side for a comforting treat. These pairings enhance the overall flavor experience and make for a delightful afternoon snack.
Need more serving inspiration? Check out this article on fun dessert presentations!
Time Breakdown for Pencil Wafer Cookies
Preparation Time
Getting started with your pencil wafer cookies is a breeze. You only need about 15 minutes to gather your ingredients and whip everything together. It’s a perfect option for a quick baking session, especially if you’re short on time but still want something delicious!
Total Time
After prep, these delightful cookies take around 20-25 minutes to bake. So, in less than 45 minutes, you can have a fresh batch of pencil wafer cookies ready to enjoy. Whether you’re hosting friends or indulging in a sweet treat solo, these cookies won’t let you down!
Looking for inspiration while you bake? Check out this guide on baking times for more tips!
Nutritional Facts for Pencil Wafer Cookies
When you indulge in pencil wafer cookies, it’s good to know what you’re savoring. These delightful treats are not just about taste; they also pack some nutritional details worth noting.
Calories
A standard serving of pencil wafer cookies typically contains around 150 calories. This makes them a moderate option for a snack or dessert. If you’re counting your caloric intake, a few of these won’t break the bank, but moderation is key!
Sugar Content
Sugar content can vary depending on the recipe. On average, pencil wafer cookies have about 10 grams of sugar per serving. While enjoying your cookies, consider balancing your diet with low-sugar options throughout the day. For those looking to control their sugar intake, you can also experiment with healthier substitutes or lower-sugar recipes.
For a more detailed look at nutritional guidelines, check out this resource from the USDA. This will give you a broader understanding of how cookies fit into a balanced diet! Remember, a little treat now and then can brighten your day without throwing your nutritional goals off course.
FAQs about Pencil Wafer Cookies
Can I use regular vanilla wafers instead of sugar-free?
Absolutely! While the recipe for pencil wafer cookies shines with sugar-free options for those watching their sugar intake, regular vanilla wafers can definitely be used. Just keep in mind that using traditional wafers will add a bit more sweetness to your cookies, so you might want to adjust the other sweeteners accordingly. It’s all about finding that perfect balance that suits your taste!
How do I store my pencil cookies?
Storing pencil wafer cookies correctly will ensure they remain fresh and delicious for longer. Here’s how:
- Room Temperature: If you plan to eat them within a week, an airtight container at room temperature works well.
- Refrigeration: For longer storage, consider refrigerating them. This helps maintain their crunchiness, especially if you’ve used chocolate.
- Freezing: If you want to extend their shelf life, you can freeze them. Just remember to wrap them tightly in plastic wrap and place them in a freezer-safe container. Thaw at room temperature before serving.
What’s the best way to melt chocolate wafers?
Melting chocolate wafers for your pencil wafer cookies is straightforward. Here are a couple of popular methods:
-
Microwave: Place chocolate wafers in a microwave-safe bowl. Heat in 30-second intervals, stirring between each, until smooth. Be careful not to overheat, as chocolate can seize quickly.
-
Double Boiler: Fill a pot with a few inches of water and bring it to a simmer. Place a heatproof bowl filled with chocolate over the pot (ensure it doesn’t touch the water) and stir until melted.
For more tips, check out this resource from Serious Eats. Enjoy your baking adventure!
Conclusion on Pencil Wafer Cookies
Celebrate Your Creativity with Pencil Wafer Cookies
Pencil wafer cookies are not just a delicious treat; they’re a canvas for your creativity! In just a few simple steps, you can whip up these delightful desserts that are perfect for any occasion. Whether you’re hosting a gathering or treating yourself, pencil wafer cookies offer endless possibilities for customization, from flavor variations to elegant presentations.
Don’t forget to share your creations with friends and family, inspiring them to join in the fun. For more baking inspiration, check out resources like Baking Tips or Recipe Ideas. Now, get baking, and let those pencil wafer cookies shine!
PrintPencil Wafer Cookies: Easy Recipes for Delightful Treats

Delight in the simplicity and flavor of Pencil Wafer Cookies, a treat perfect for any occasion.
- Prep Time: 15 minutes
- Cook Time: 12 minutes
- Total Time: 27 minutes
- Yield: 24 cookies 1x
- Category: Dessert
- Method: Baking
- Cuisine: American
- Diet: Vegetarian
Ingredients
- 1 cup all-purpose flour
- 1/2 cup unsweetened cocoa powder
- 1/2 cup sugar
- 1/4 cup softened butter
- 1 egg
- 1 teaspoon vanilla extract
Instructions
- Preheat the oven to 350°F (175°C).
- In a bowl, mix together flour, cocoa powder, and sugar.
- Add softened butter, egg, and vanilla extract, then mix until smooth.
- Drop spoonfuls of dough onto a baking sheet.
- Bake for 10-12 minutes, then cool before serving.
Notes
- For extra flavor, consider adding a pinch of salt to the mixture.
Nutrition
- Serving Size: 1 cookie
- Calories: 100
- Sugar: 6g
- Sodium: 50mg
- Fat: 4g
- Saturated Fat: 2g
- Unsaturated Fat: 2g
- Trans Fat: 0g
- Carbohydrates: 15g
- Fiber: 1g
- Protein: 1g
- Cholesterol: 20mg
Keywords: Pencil Wafer Cookies, cookies, dessert